Saturday 28 March 2015

Cactus Flowers

I like to have plants at work. I have quite a few in fact...Luckily, the window sill is very deep!
A year or so ago I bought a little cactus that was in flower and put it right in the window and did my best to neglect it in the hope it might flower again. Well it has!! Just look at this -

Cactus Flower

I have a Haworthia as well in a pretty multi coloured pot - it's actually a tea light holder but after much hunting, I found a plant pot that just rests in the top.
Haworthia
This plant also sits right in the window and has thrown out a long flower stem that must grow at least an inch a day and the tiny flowers are finally beginning to open -
Haworthia Flower

They're so tiny and delicate and I can't imagine what type of insect pollinates it.
I have a mother-in-laws tongue as well that has been with me for about 10 years now. His name is Spike. He did flower once and they were gorgeous little star shaped flowers that didn't open until late afternoon and come morning, they had closed and withered. Clearly designed to attract night pollinators. I have some photos somewhere but they're on the old laptop/hard-drive - I really must copy them across...

Wednesday 25 March 2015

Theatre Trip

Another theatre trip - I'm getting very cultured!! This time to see to Kill a Mocking Bird at the Mayflower, Southampton.

To kill a mocking bird

I actually went last week and started to write a post but got side-tracked and forgot.
We had no idea what to expect but weren't disappointed with the production. It all took place on just one stage set - the only things that changed were a tyre hanging from a tree and the type of table/chairs along both sides of the stage. The whole cast was on stage almost the whole time and different members would take the role of narrator, almost passing it back and forth in each scene.
The courtroom scenes were quite gripping.
It was quite funny to listen to the 2 chaps behind us during the interval. They didn't look the type to go to the theatre at all - more a beer festival type really!!! Sorry lads... They didn't get the "chalk" at the beginning - 2 members of the cast drew a street plan on the stage but as we were in the stalls we couldn't fully appreciate this. And they thought it strange the way the furniture was moved around the stage in an "elaborate way". But it was such a simple set, it wouldn't have been right to have a stage hand try and do it without anyone noticing. The cast moved the furniture, so made it part of the show. Elaborately. And lastly, they thought it odd that the part of the narrator was filled by several people, often in the same scene. But it worked. And the 3 children in it were very good. The only character I wasn't keen on was Atticus himself. But when you've seen Gregory Peck play the part that's not surprising.

The only thing to spoil an otherwise enjoyable evening was that unfortunately, the seat my friend was sat in broke just as the interval came to an end. Rather than make a fuss, he had to try and sit upright for the next hour... He sent them an email the next day - not really complaining, just making them aware so they could fix it as much as anything. He got a reply straight back apologising and offering complimentary tickets to any of the next 5 shows. What brilliant customer service!
The only one we can both make is Spamalot. Should be interesting...

We've already booked tickets for The Curious Incident of the Dog in the Night Time but that's not for 3 months yet.

Blogging tips...

Sometimes I see blogging tips on Pinterest and have recently started reading them. Fancy that...
Today, I saw that Steph de Nitto (she used to work here too) had pinned a link on Pinterest to Jana's blog which said that when you insert a photo, you should always name your photos via it's properties as opposed to just a caption. Apparently, when people are then searching on google images for something, (other search engines are available...) like "fabric book cover", your image and therefore your blog, is more likely to be found and therefore attract more readers. They don't even have to search for exactly the name you give your photos, as long as it's in the name somewhere. Shame I didn't know that before as I don't think I can now add them without editing every post... So, ever the Blue Peter fan, here's some I made earlier!! Lets see if it works...


fabric book cover
 Pocket love, felt hearts


crochet ripple blanketcrochet hexagon blanket

Saturday 21 March 2015

Pocket Love #3


They're done!! They don't have the embroidery I had planned on doing though. We're about to start decorating, so everything had to be tidied up and packed away but I think they're ok. They're so tiny they'd look wrong if I tried to do too much on them anyway.
There are a dozen of them and I thought Mara might like to give them to her family and friends.

Before packing everything away, I had made a couple of felt hearts, decorated on both sides - one for Mara and one for my friend. Hopefully, all the recipients will like them and perhaps go on to make their own versions to give away.
I thought it might be a nice idea to put together a little sewing kit for Mara, with some reels of thread, a pack of needles, tiny scissors and a few little pieces of fabric, felt, lace, ribbons and so on. Had I thought of this sooner, I could have made a little quilted zip-up bag, a needle case, scissors case etc etc. Even the dining table has been taken apart, so there's no-where to use the sewing machine anyway and with virtually everything packed away, whatever I make will now all have to be hand stitched. But I don't mind that - it's quite therapeutic and shows you've taken extra time and care over making it.
Of course, I may need to buy more crafty bits in order to make things for her...

Wednesday 18 March 2015

Winchester Cathedral

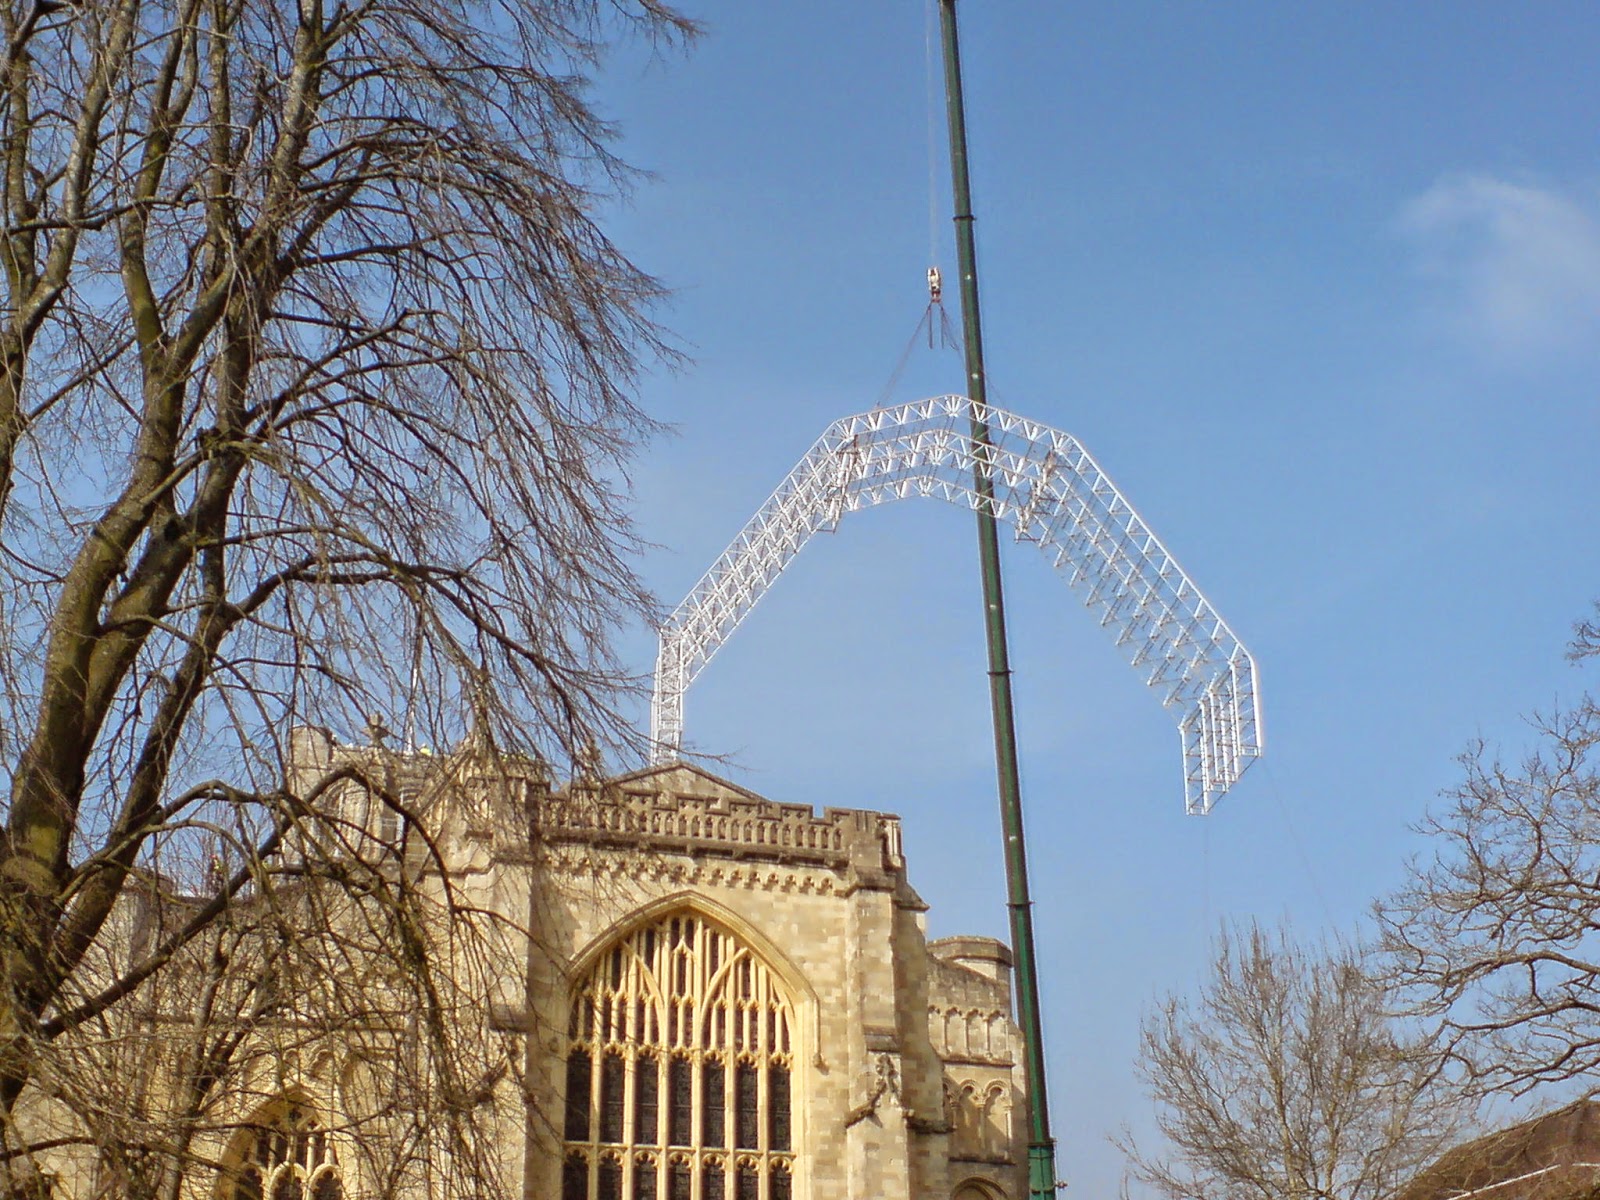
We had much excitement at work today!! The presbytery roof has needed repairs for a long time and with Lottery funding, the work is under-way at last. (Have a look at their website for more details.)
For several weeks a large "archway" of scaffolding has been erected on the ground and today it was being hoisted piece by piece onto the roof. It should have all happened yesterday but there was a delay which was quite lucky really as today brought clear blue skies, rather than heavy mist...

I was hoping to be able to insert a slideshow into the side bar but it won't work...so I'll have to make do with inserting a whole load of photos - sorry, there's rather a lot! Click on the first one and you should then be able to cycle through them quite quickly. It almost looks like time lapse photography.


The work will take at least 2 years but hopefully, once complete, the roof will last 200 years. There's lots to see at the cathedral and it's well worth a visit if you're in the area.

Monday 16 March 2015

Pocket Love #2

Thought I'd have a quick look and see if I could find the original Pocket Love post I saw. I came across this one on Curly Birds straight away which pretty much says the same. Enjoy...


Sunday 15 March 2015

Pocket Love

A year or so ago I saw something online and tucked it away in the back of my mind to make one day.
It was a small heart, made of felt I think, only lightly stuffed, decorated with tiny buttons, beads and some embroidery. It was lovely.
The idea was that you made it with someone special in mind and upon receipt, that person would keep it in their pocket. Every time he/she put their hand in their pocket, they could give it a little squeeze, think of you and know that they are loved. Such a sweet idea.
I decided to make a whole handful for my friend to take out to the Philippines. One for Mara, the little girl he sponsors, and the rest for her to give to her family and friends.

I sorted through one of my boxes of fabric left over from my quilting days, thinking I might make them from an assortment of bright colours. But then I came across a little packet of dyed silk that I had quite forgotten about. I bought it at a quilt show in Romsey, Hampshire, 2 or 3 years ago. It had its own story.
It was originally a beautiful white silk wedding dress which was dyed in a whole rainbow of colours, then cut roughly into pieces and put into sets, which were then sold to raise funds for charity. But I can't remember if the lady who had owned the dress had divorced so no longer wanted the dress, or if she just decided she didn't want to keep it anymore so found a new use for it. Either way, she had dyed it in a fabulous range of colours. I chose golden yellow through to sunset red.I made a couple of needle cases with narrow bands of colour arranged sunset style. Do you think I can find a photo?? No. Never mind. I did find some chickens though - aren't they fun?!


Anyway, my little hearts. I started by drawing a heart and getting it to the shape I wanted, then using it to make a little cardboard template to draw round. I lay the silk pieces onto a small sheet of fine sand-paper to hold it in place while I drew round the template. A brilliant idea that I used to use for marking the stitching line when I made half square patchwork pieces.


I cut a short piece of lace to lay across each heart before joining the 2 sides - sorry, forgot to take a photo. I snipped the curved seam around the top before turning through, then stuffed lightly and slip stitched the opening closed.


Then add a bit of extra decoration if you so choose. So far, I've only put on a tiny button but I might work a few embroidery stitches later. 
I didn't have time to complete all the hearts today, with lots of photos along the way, so there's likely to be an update later.

To finish today, here's another photo of the book cover I made for Mara last week. I decided I needed a better photo of the front cover! I lay it on the hexagon blanket I finished just over a year ago. But that's another story...


Sunday 8 March 2015

The Book Cover - a sort of tutorial

For a long time now I've wanted to make a version of the book cover I saw well over a year ago on Pinterest.
Well, I'm finally going to do it! A friend sponsors children around the world through Compassion  
and is visiting one of the girls in the Philippines next month and I thought it would make a nice gift for her.
I know the construction method I want to use as I've done it before and it's really easy and I thought it would be nice to put in a tutorial that you could follow if you wanted to. But I have never written a tutorial before.  I did a very quick search online and found this one made by Charlotte Scott– it was literally the first tutorial I looked at!! – and apart from mine not being a patchwork style cover, it’s pretty much the same.
Charlotte is an "art quilter", if that's the right term and a quick look through her blog shows some pretty amazing pictorial quilts. I know I'll be going back for a proper look! And yes, she very kindly agreed I could add a link to her tutorial rather than write my own. So follow the link above to her tutorial and I'll just put in lots of photos of mine.

I have a small scrap of pale pink gingham for the top portion of my book cover (although I'll need to piece the inner flaps) and bought a piece of lovely soft raspberry Aida for the lower part, along with lace and ribbon from the wonderful Creative Crafts in Winchester. The ladies there were so helpful and I was able to buy exactly the right sized piece of Aida, rather than being told “No madam, you can’t have a piece 15cm x 40 cm - the smallest cut is half a meter of the full width. That’ll be an extortionate amount of money please.”
It only cost £3 for the fabric, the lace and the ribbon. The book I'm covering came from poundland and all the other materials are leftovers from previous projects. £4 for a handmade book cover – bargain!!!

All the fabrics ready to go...
Measure all the round the outside for your finished size, add extra for the flaps
If you measure the book opened flat, your cover will be an inch too small...
Couldn't resist taking this photo! I've had this hand wound tape measure for more than 30 years.One of my treasured things.
Everything layered ready to pin and sew.
You can see here that I had to piece the pink gingham to have enough length for the flaps.
All the layers neatly stitched together
The wrong side showing 2 rows of stitching to join the gingham and Aida (they were just overlapped,not seamed), 2 rows to attach the ribbon, and a straight row and zig zag row for the lace
I placed pins for the centre spine and front of notebook before adding appliqué hearts 
This will be the end of the bookmark
Lay the book cover right side up and fold the flaps in and check the size
Lay the lining right side down. Stitch top and bottom only

Oops! Forgot to insert the book mark!

I used to add these tiny little hearts to everything I made. This is inside the front flap
Plus a label in the back flap
Did I say I'd added a flower to the back as well??
I'm tempted to embroider the little girls name on the aida part of the front cover but at this stage
 it would be a right fiddle and probably spoil it. Should have thought of that sooner...
The back
TA-DAH !!!
It took me six hours from start to finish - but that did include a lunch break and a couple of quick coffee breaks. Plus taking loads of photos!!! But then a picture is worth a thousand words and having said I'd never written a tutorial, I haven't done too bad a job, even if I do say so myself! Although I would still recommend that you have a good look at Charlotte's.
To cut down on bulk I joined the gingham and aida by simply overlapping them and stitching 2 rows. I then placed the ribbon so it just came to the bottom of the gingham and worked another row of straight stitch, then a row of zigzagging along the top edge of the lace. The ribbon was butted up against the lace and stitched right on the edge, top and bottom. (The deep pink edge was stitched with pink thread, the only time I changed thread colour.)
The edges of the inner flaps were also finished with a length of the lace rather than folded under.

After turning through the finished cover and finger pressing the edges, I decided to insert a piece of white felt to use as "interfacing", to give a slightly padded finish. This was simply cut slightly smaller than the finished cover and carefully placed behind the lining and behind the seam allowances. It's not stitched in place, it just sits there nicely. If I'd thought of this before, I would have made the cover 1/4" larger. It's a close fit now...

I'm very pleased with the finished book and hopefully it's recipient will love it.
I want to make another one now...