Showing posts with label scarf. Show all posts

Saturday, 29 September 2018

A Tail of two Dragons goes stripey!

My Tail of two Dragons Scarf has been getting quite a bit of interest lately and it reminded me I always planned on making one with two colours.
(Click the link above, or in the side bar to hop across to Ravelry to buy the pattern.)
I'd bought some gorgeous balls of Debbie Bliss Baby Cashmerino in aqua and turquoise quite a while ago now as I knew as soon as I saw them they'd be perfect for it, I just hadn't had time to make it.

I decided to start with the lovely pale aqua and gradually merge into turquoise. Scroll down for lots of pics and my guide to the stripes.

Tina's Allsorts, A Tail of Two Dragons Scarf

Tina's Allsorts, Tail of two Dragons Scarf

Tina's Allsorts, Tail of two Dragons Scarf

Tina's Allsorts, Tail of two Dragons Scarf

Tina's Allsorts, A Tail of Two Dragons Scarf

Tina's Allsorts, A Tail of Two Dragons Scarf

Tina's Allsorts, A Tail of Two Dragons Scarf


(Did you see Fluffy photo bombing some of the pics??!! Look dead centre at the top of this last pic! I didn't notice him until I'd downloaded the pics and started cropping them and then fell about laughing!!)

Anyway, the stripes. As mentioned, I used 2 toning colours in a light and medium shade, although you could probably get a good effect from a more striking contrast of colours.

I made it exactly according to the pattern and had 240 rows when I cast off. If you are aiming for more or less rows, you will need to recalculate.

I began with the aqua yarn (colour 1) and worked the first 60 rows. Then I  joined in the turquoise yarn (colour 2) and worked the next 2 rows, cut the yarn for colour 2 leaving an end and picked up colour 1 again. I didn't break off colour 1, I just carried it up the side of the work, "fairisle style" on each row end so I didn't get a loop. Once I reached the point where I needed to carry the yarn over 6 rows, I did break the yarn and joined it in again later. It made for a lot of ends to sew in but the neck edge was neater.
I continued like this, keeping the pattern correct and switching back and forth between the two colours,  using the following sequence of stripes -

ROW No.
1 - 60            60 rows colour 1
61                 2 rows colour 2
63                 8 rows colour 1
71                 2 rows colour 2
73                 8 rows colour 1
81                 2 rows colour 2
83                 8 rows colour 1
91                 4 rows colour 2
95                 6 rows colour 1
101               4 rows colour 2
105               6 rows colour 1
111               4 rows colour 2
115               6 rows colour 1
121               4 rows colour 2
127               6 rows colour 1
133               8 rows colour 2
141               4 rows colour 1
145               8 rows colour 2
153               4 rows colour 1
157               10 rows colour 2
167               4 rows colour 1
171               10 rows colour 2
181               2 rows colour 1
183               10 rows colour 2
193               2 rows colour 1
195               12 rows colour 2
207               2 rows colour 1
209 - end      continue with colour 2 only

(As the scarf has a textured pattern, you will have some rows of colour that make little bumps on the right side and some don't.) 

Here's a link to my striped version on Ravelry - take a look if you want the exact yarn details etc.
and if you make your own, please do link your project as I'd love to see your version!!

Happy Knitting!!

Thursday, 19 July 2018

Catching up!

So it's been a month since I popped in here - again.... I'm sure I've done loads  in that time I could chat about, so I figured I'd just check back through my Instagram feed to see what I've been up to!

In reverse order, this is my current project - a baby blanket combining lovely big white daisies and a ripple pattern. It's called the Daisy Chain Blanket by Harlow Monroe Handmade and is available to buy from Ravelry.
There are so many different colour combos you could go for with this blanket but I went for duck-egg green, silver grey and white. It's only an acrylic/nylon yarn but is working up very soft. I don't have long to get it finished so need to get a move on really...

Tina's Allsorts,

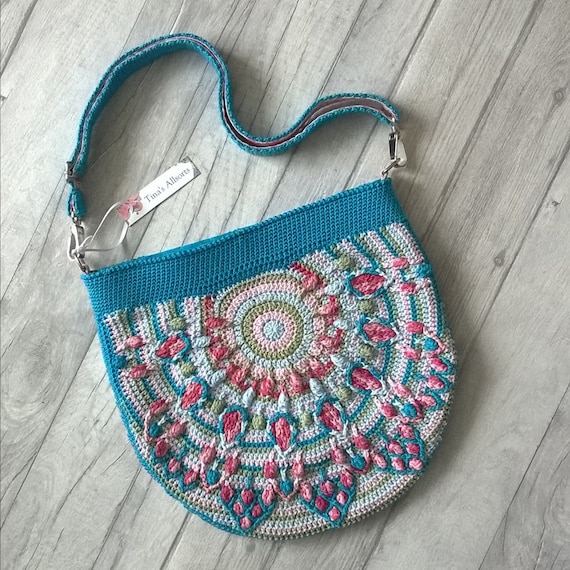
Prior to that was this very bright and colourful bag. It's a crochet square which was designed by Emily of the Loopy Stitch and then sold by Jane of Queen Bab's, to raise funds for a wheelchair and accessories for Jane. I decided to attach the square to the front of a very simple little bag on a long strap - just right for summer festivals!! 
I took lots of photos along the way with the intention of writing a little tutorial of how to make your own bag. It will have it's own page when it's ready but it's not quite there yet. Isn't it a GORGEOUS square though?? I really enjoyed making it too.

Tina's Allsorts,

Tina's Allsorts,

Tina's Allsorts,

Tina's Allsorts,

I'm also working on an asymmetric knitted shawl on and off, with the intention of writing up and selling the pat*tern. In the pic below it had started to go wrong though... I was using different textured stitches and tried a diagonal line - but the tension was so loose it really started to grow in width!! Needless to say, this section was frogged and something different has replaced it.

 Tina's Allsorts,

There's also an aran scarf in the process of writing and finalising. This also has several different textured patterns in it to make it really interesting not only to wear but also to make. All the stitch patterns are very simple though so that even an adventurous beginner could make it. Here I've used a wool & alpaca blend to make it the initial sample and it came out beautifully! 

Tina's Allsorts,

A lady at Knit and Knatter is testing the pattern with acrylic and it's quite a different beast...

Tina's Allsorts,


Tina's Allsorts, I was delighted to manage to get one of the new ten pence pieces recently. Someone was going to the Royal Mint for a visit, so bought one in a presentation pack for me - and joy of joys, it's got a Tea Pot on it!!! How apt!! (See my Tea Cosie tab!!)
On a perhaps more solemn note, I managed to get to see the Poppy Wave display at Fort Nelson near Portsmouth, just before it closed. Oh my, what an absolute spectacle it was!! Quite stunning and a very moving tribute to those who fought and lost their lives in the First World War.
It had originally formed part of the display of poppies at the Tower of London in 2014 and has been touring the country - this was it's last stop before going on permanent display in Liverpool. 
It was a beautiful morning and we popped down early, partly to be there before it got busy and partly as we had other things to do that day. I'm very glad we were there early as when we left around 11.30am, the queue looked to be at least 2 hours long!! It was definitely worth a 2 hour wait - but it was in the blazing sun...

Tina's Allsorts,

Tina's Allsorts,

Tina's Allsorts,

Tina's Allsorts,

Tina's Allsorts, If you pop in here regularly, you will know that I designed a mixed stitch crochet blanket just over a year ago, which is available as a free pat*tern on Ravelry (see the separate tab at the top of the page). It had it's one year anniversary of being published last week - and look how many people have downloaded it in that year!! I hope at least 1% have actually used the pattern, rather than simply download it...
And I'll end today with my most recent finished and published pat*tern - my Popcorn Dreams Scarf. It felt like it took an age to design and make it, write it up, test it, get other people to test it as well.... But I got there eventually. All the versions below are by my testers and aren't they simply lovely?? If you'd like to see more images, then pop across to Instagram and search for the hashtag #popcorndreamsscarf .

This one is by Helen, aka Flora Honeypot.
Tina's Allsorts,  Popcorn Dreams Scarf
This is by Jan.
Tina's Allsorts,  Popcorn Dreams Scarf

Tina's Allsorts,  Popcorn Dreams Scarf
And this one by Julie - and she dyed the yarn herself.

This lovely, slightly larger version is by Torun - it shows how easily you can adapt the pat*tern to suit the size you'd like.
Tina's Allsorts,  Popcorn Dreams Scarf

Tina's Allsorts,  Popcorn Dreams Scarf
And here's a little montage of pics - and none of them are my own!!
Tina's Allsorts,  Popcorn Dreams Scarf
I'll finish today with this fabulous pic of the Cathedral that I took earlier this week in the evening sunlight. I even managed to get the statue of the soldier in the shot.

Tina's Allsorts

I'm off on my hols very soon, so won't be back here until August. Hope you're enjoying the unexpected heatwave we are still having here in the UK?! I'm really hoping it will last another 2 weeks!

Take care,   T  xXx

Saturday, 19 May 2018

Time flies!

I've been away from my little space for HOW LONG?? Six weeks?? Really?? SIX? How did that happen?..... Guess I must have been busy...

Busy with the beach bag I mentioned last time, that's for sure! It took a bit longer than planned as it became a bit more detailed - especially the lining. But it is now finished and listed on Etsy, should you care to take a look. Thankyou to all my lovely followers on instagram, who helped with the design process!
I'm toying with the idea of making another but doing it more slowly so I can write the pat*tern up with lots of pics - and a choice of either a detailed lining for the sewing experts, or a really simple hand sewn one for the non-sewing. But pat*tern writing takes a long time you know, so it may not happen anytime soon!

I took it down to the local beach for a little photo shoot to try and get some nice pics for Etsy. While I was there, I took some more pics of my Tooty Harmony Blanket and the Winterberry Blanket which is on Folksy. Want to see??

Tina's Allsorts, Crochet Beach Bag

Tina's Allsorts, Crochet Beach Bag

Tina's Allsorts, Crochet Beach Bag

Tina's Allsorts, Crochet Beach Bag

This last shot was designed to show just how BIG the bag is, as the ones with props made it look medium sized. It isn't - it's two feet wide!

I finally went back and finished the border on my Tooty Harmony Blanket. Just a very simple border of treble crochet which frames it nicely.

Tina's Allsorts, Tooty Harmony Blanket

 And you can really see the little bobbles on the Winterberry Blanket in the sunshine! That's still listed on Folksy at the moment but will transfer across to Etsy soon.

Tina's Allsorts, Winterberry Blanket

Tina's Allsorts, Winterberry Blanket

You will also find the Peacock Tail Bag I crocheted a while ago - I have re-listed it on Etsy with some new photos.
Tina's Allsorts, Peacock Tail Bag

Tina's Allsorts, Project Bag


Tina's Allsorts, Project Bag


The "I Love London" print project bag I showed you (6 weeks ago...) has sold and is on it's way to Oklahoma as we speak! It may even have arrived today. I will buy more of the fabric and make another as it was rather fun. It's Woodland Friends partner (see pic) is still available, if you're interested??


On the pat*tern writing front, I've been busy writing, re-writing, re-writing and yes, re-writing again, a crochet scarf pat*tern. I think I've shown you a sneak peak before. It's a long, narrow crescent shape with a nice bit of texture.

Tina's Allsorts, Crochet scarf
It's getting close to being ready for someone to test it for me. I can try and test the pat*tern myself but to be honest, because I know it inside out now, I might not actually do what is written but automatically do what is right. If you know what I mean?! Each version I have made has come out a bit different as I've developed the shaping of it. The increasing was soooooooo simple - the decreasing? No. Again and again and again I tried. But eventually I was happy with it.

Designed to be a one skein scarf, preferably in a beautiful soft merino 4 ply but equally nice in a soft baby 4 ply. The main reason it took so long was because I wanted it to only need one skein. Knowing exactly when to start changing your shaping for the decreasing wasn't easy at all!

It doesn't have a proper name yet - something that took so long deserves to have just the right name but I'm not quite sure what. If you have any ideas, please do drop me a line!

Tina's Allsorts, Tooty Stripey Blanket
If you're a new visitor to my blog, perhaps you landed here via Your Crochet, one of the free pat*tern websites? My Tooty Stripey Pat*tern was picked up by them in mid April and has been very popular, with lots more people downloading it.
They gave it a lovely write up, with links to the pat*tern on Raveley,  plus my blog page - and even protected the content so the picture couldn't be copied.
 One of those people asked me for US Terms version of the key to all the stitches I used and I was very happy to oblige. I don't know why I didn't think of it before - sorry!

If you have downloaded it and made your own version, I really would love to see it, so please do get in touch - or share it on instagram and tag me. And don't forget, it has it's own dedicated page - click the button at the top of the screen.


On a sad note, I'm very sorry to say that Creative Crafts,  the craft shop where I have worked one day a week for the last two and a half years has now closed. Ridiculous rate and rent increases, coupled with the rise of internet shopping finally became too much and after a big sale, the store closed at the end of April. A great loss to the city  of Winchester.
There have been a lot of independent retailers priced out of town by greedy landlords over recent months - as it's one of the best places to live in Britain, they seem to think they can charge what they like. But the thing that makes it one of the best places is the quirkiness of all the different shops. The new retailers moving in are the big chains though, so the city will soon look just like any other.... And anyone who loves arts and crafts - like me - has lost a massive resource. Very sad indeed.....

So my Mondays now feel very empty and strange, as I'm sure is the case for Lyn the owner and the other staff - and my body clock is completely thrown out!

On the up side, I did have someone offer to sell printed copies of my Tail of Two Dragons Scarf pat*tern at a yarn fair, along with my stitch markers recently. I didn't have many stitch markers made - and they certainly weren't packaged in any way - so I spent several frantic evenings making loads of them! I've yet to hear how many sold but I enjoyed making them so much I think I'll make a batch and try them on Etsy.
The same people also suggested I might like to design some of my own knitted and crocheted items with accompanying pat*terns, that can be made up in the wool they spin themselves. My pat*tern will showcase their yarn and their yarn will showcase my pat*tern. So I now have a head absolutely BUZZING with ideas on what I could make!! I thought a man's scarf and a ladies textured shawl to begin with, preferably using yarn in its natural undyed colour. But what weight of yarn??... Decisions decisions!

Anyway, I think that's enough for today! I'll try not to leave it so long before I pop in again!!
Thanks for reading!    T   xXx


Tina's Allsorts, Fluufy

PS  Fluffy says Hi!!


Sunday, 21 January 2018

The Dragon's Tail Scarf

If you follow me on Instagram you'll know I had been making a little scarf/shawl with a jagged edge along one side and a long curve on the other - a bit like a Dragon's Tail perhaps?? (I'm not sure yet whether to call it my Dragon's Tail Scarf as the name has been used quite frequently by other people. But what else could I call it??)

I'd looked for the perfect pattern for some considerable time but couldn't find one anywhere that was exactly what I wanted and realised I would have to try and design my own.

I mentioned at New Year that I'd seen a design called the Hitchhiker scarf  way back in May and I really liked the teeth along the edge - but it was all in garter stitch and I don't like knitting garter stitch at all and I'm not keen on its texture either. (Although I have now discovered I don't like working it due to my knit row tension being too tight, not the stitch itself - although my New Year's Crafting Resolution is to try the stitches I'm no good at and maybe with practise I will grow to like them!)
I didn't see the point in buying a pattern that I would then change beyond all recognition, as I knew it should be fairy simple to work out something with teeth for myself and there was no way I could bring myself to make it all in garter stitch - I wanted ridges and furrows and eyelets!! (Yes! I want it all!!)
So I set to with needles and wool and working out the texture pattern wasn't too difficult at all as I already had a good idea what would work, it was getting the shaping right too that took a bit of time and there were several frogged samples!! I think I've shown you these pics before, when it was starting to go right -

Tina's Allsorts, Dragon's Tail Scarf

Tina's Allsorts, Dragon's Tail Scarf

Eventually (after several hours if truth were told!), I was fairly confident my pattern would work, so I wound my 2 beautiful skeins of Northanger Abbey DK (hand dyed by Miss Moffat Yarns) and tentatively made a start. Then frogged it and started again. Twice...
But then I got the hang of the pattern and the row counting and it rolled along quite well. Although every night I unpicked at least one row once!

Although the pattern itself is simple, there are two things happening at once - creating the texture I wanted with a 6 row pattern, and creating the toothed/curved shape, for which I settled on an 8 row pattern. And when you're not used to counting rows with a texture you're not used to,  it's actually quite easy to get it wrong!

Tina's Allsorts, Dragon's Tail Scarf

The texture pattern I settled on really shows off the plumpness and squishiness of the yarn - I don't think I've ever used anything quite like it. And the colour is just amazing - the pic above captures the colour well. I couldn't resist trying to capture the squishiness on video - 


Tina's Allsorts, Dragon's Tail ScarfI didn't want my shawl/scarf to get wider and wider - and wider! - as so often happens with other shawls. I wanted something that would stay manageable when wrapped around my neck. I  did it by gradually making the teeth along the edge bigger and bigger and just kept going until I ran out of yarn. (This pic is pre-blocking and doesn't show the yarn colour correctly...)

Once done and loosely cast off, I gave it a good soak to really let the water get into the fibres, gave it a good squeeze then a turn through the salad spinner  (yes, really!) and it was ready for blocking. I don't know if you're aware but pure merino becomes very soft and pliable when wet and you think you've Ruined it!! Very scary! But don't panic.  Be gentle with it and definitely dry it flat and all its lovely squishiness and plumpness will return.

I very gently spread it across the floor, trying to only open out the outer toothed edge and left it 24 hours to dry - it was still slightly damp then so I folded it up and put it in the airing cupboard to finish.

And now it's glorious!  I haven't had chance to take any more pics but I keep going back for a squeeze or two and trying it on this way and that - and wishing the weather was cold enough to wear it!

It would look really good in a solid colour as the texture pattern would show up really well and I have some lovely hand dyed 4 ply that would be just right. I tried to persuade a friend to knit it for me but she wasn't having any of it! Not sure I have the patience to make it in 4 ply myself though! I might
have to work out a crochet version as well!

I have now come across a very helpful website that explains how a "vortex shawl" works - never knew they were called that - and how to design your own. Oh how I wish I'd found it sooner - I could have saved myself a lot of effort but I was searching for a pattern - not instructions on how to design my own! But then if you don't work it out for yourself, you don't necessarily understand how the pattern "works".
The site even has some books you can buy and download on how to design different styles of shawls which looked quite tempting! Go and have a look here -

https://knitting.today/vortex-shawls/

I still haven't written the pattern up properly but it will be available on Ravelry when it's done. And I still can't decide whether to charge a small amount for it or not... Got to write it first though!!!
I'm a bit distracted at the moment with a commission for a pair of dog coats which I'm also designing as I work.

More about that next time. Have a good week,  T  xXx

Tina's Allsorts, Dragon's Tail Scarf