

Materials
25 cm/10" strip of upper body fabric (9" square needed per chicken)
25 cm/10" strip of heavyweight lower body fabric (8" square needed per chicken)
25 cm/10" strip of thermal curtain lining, or anything with a very tight weave, for the lining
25 cm/10" of strong cord for the comb
Oddment of golden yellow felt for beak (2" x 3" will do)
"Made by Me" label, if you have one
Matching thread
Pair of googly eyes
Glue
A little toy stuffing (optional but I prefer it)
Clean sand/fine grit for filling
My local shop sells fabric in a minimum cut of 25cm wide. This was enough to make 4 chickens of my chosen size. Had I actually thought about it and made them slightly smaller (ie about 8.5" not 9" square) I could have made 5 from the same amount of fabric.
(You could also use ready cut squares designed for patchwork - I think they're called layer cakes?)
The thermal curtain lining has a very fine weave and is also pretty strong - this will keep your sand in your doorstop, rather than escaping through the weave and leaving dusty little heaps on the floor!
There's one thing you need to consider before cutting out. Does your Lower Body Fabric have an obvious one way design or nap?? Like stripes? If the answer is no, then lucky you! Go straight ahead and cut a single square. But if you answered yes, then you'll need to cut 2 squares to be able to get the pattern to run in the same direction on both the left and right sides of your chicken. Don't worry, it's easy. Ready??
Step 1. Cut your Upper Body Fabric - mine is 9" square. In the lower left corner, cut a 1" notch - this isn't essential, you can trim up later. (You can make your chicken with squares of the same size but personally, I found that made a chicken that "leaned forward" too much - my one inch size difference makes my chicken sit more upright, as you'll see in the very last photo. It's a Pythagoras thing - don't ask me to explain!)

Step 2. Look at your Lower Body Fabric. Does it have a nap or one way design. Mine does - I've cut 2 squares and marked the edges with symbols to make it clearer. See those little v's at the top edge and dashes on the side edge?

Step 3. Cut your 2 squares on opposite diagonals. I've taken one of the lower ones away to make a space.

Step 4. Make a new square on the right by moving the upper left triangle to the lower right. Look at my symbols - matching symbols are now on adjacent sides, not opposite. Make a second pair with the other 2 triangles to use for another chicken.

Step 5. Lay your pair of triangles on top of the upper fabric square, with right sides together and pin. Be very careful how you handle and pin them at this point as the bias edges of the triangles will stretch easily.

Step 6. Now stitch either side of the diagonal cut line with a 3/8" - 1/2" seam allowance. Then cut through the upper body fabric, following the line of the triangles.

Step 7. Gently press the seams to set the stitches, then open each seam and press the seam allowance towards the upper body - still taking care with this bias edge. Topstitch this seam to add strength to the bias edge. (Apologies for my stitching, the tension went wrong. I did unpick it and re-stitch later.)

Step 8. Now cut and topstitch your chicken's beak. Mine is made from 2 pieces of felt cut to approx 1.75" wide x 1.5" high - the extra 1/4" on one side will sit inside the seam allowance of the upper body. Topstitch a V shape and add a curving "smile". Trim just outside the V shape.

Step 9. Using the piece of cord, form the chicken's comb from 3 loops with each slightly smaller than the last and stitch in place with the biggest loop closest to the fabric edge. (My photo has helpfully decided to sit portrait style rather than landscape - sorry.)

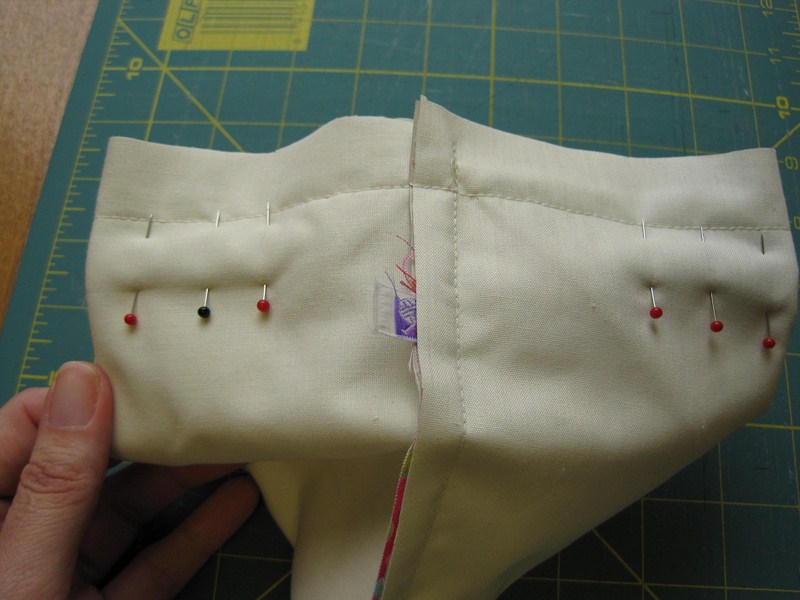
Step 10. Here you can see the placement of the beak, comb and makers label if you are using one. This step is very important - get it wrong and your chicken will spend its life looking at the door it's holding open! In the photo below, the upper body triangle is uppermost, with the beak placed on the top edge. The comb is at the top left edge (both approx an inch from the corner) and the makers label at the bottom left. If you look just below my label, you can see where the one inch notch that I cut on the upper fabric, has been trimmed level with the slightly smaller lower body fabric.

Step 11. Lay the other body on top, right sides together, matching the diagonal seam and making sure you place upper body to upper body. Stitch 1/4" seam on 3 sides, leaving the lower edge open - this will be the back edge that sits against the door.
NB. On the "placement guide" photo you will find later, I've marked the corners as A,B,C, & D and E/F in the centre of the bottom edge. Stitch from A to B to C to D, in step 11.

Step 12. Now you're going to add the lining fabric. I've cut mine 1/2" longer on one edge - can you see it just poking out at the bottom? That little extra bit will help when you come to stuffing and stitching closed. Place the other piece of lining on top and stitch along the same three edges, this time with 3/8" seam. Make sure you back stitch the comb to make it really secure. The comb will eventually be used to pick up the chicken and needs to be able to take the weight.

Step 13. Add a line of stay stitching along the open bottom edge. You can see again how my lining is cut a bit longer.

Step 14. Go back and look at the wattle/beak corner. To make a nicely shaped head, round off the corner and trim off the excess. Trim the opposite corner as well. Not too close - you don't want to risk a hole forming!

Step 15. Here's my chicken with the bottom edge still open.

Step 16. Turn through and push out the corners neatly and make sure everything is placed where it should be. If you got the beak and comb the wrong way round, you still have chance of swapping them round but it will mean fiddling unpicking and re-stitching. Mine is fine, with the open edge on the right in the photo. Now turn wrong side out again, ready to stitch the final seam.

Step 17. This seam will transform your flat chicken into a 3D chicken. Once you've done it once, it will be easy. Take hold of the 2 seams in the open edge and bring them together so they are now in the middle, rather than at the edges. Put a few pins in to hold it in place and you will be able to see the pyramid shape emerging. Stitch the outer third of each side, leaving the centre (where the seams meet) free for turning through to the right side again later.
NB On the placement guide you will see later, you need to bring together the corners marked A and D together into the middle. Points E and F are now at the outside edges.

Step 18. This angle shows more clearly the back seam (with the makers label sticking out) now in the middle.
Step 19. Stitch just inside the line of stay stitching you did in step 13. Back stitch well at the edges.

Step 20. You're nearly ready to turn your chicken through the right way again.

Step 21. Just before you do, trim the corners of the edge you've just stitched. My lower body fabric frays easily, so I've only trimmed the lining fabric to reduce bulk.

Step 22. Put your fingers into the opening and grab hold of the comb and pull gently. Carefully wriggle your whole chicken through the opening.

Step 23. Push and pull the corners until you are happy with them.

Step 24. Plump her up a bit. Doesn't she sit nicely? Now for the filling...

Step 25. Using some toy stuffing, put some in the "head" corner. (I didn't use all the stuffing you can see below.)

Step 26. Holding you chicken head down, start filling with clean sand or fine grit. (I don't use anything edible, like rice, for doorstops as there's always the potential that it might get wet and rice would swell. It might also attract insects/pests.) I'm using my jam funnel to help put the sand in. Keep thumping your chicken on the table to pack the sand down. Add some stuffing to the "front" point, then add more sand. While there's still a bit of room, put some stuffing in the other 2 corners, add sand and give it another really good thump. When you're happy with the amount of sand, add a final bit of stuffing just inside the opening and turn the seam allowance to one side - that's where the extra bit of lining fabric comes in handy.

Step 27. Add a little glue to this bit of extra lining fabric and squeeze the edges together. This will just help to stop any sand escaping. Wait a few minutes for the glue to dry.

Step 28. Using matching thread, work a really neat ladder stitch along the opening (google it if you don't know this handy stitch).

Step 29. Finally, glue a pair of googly eyes in place and sit your chicken against the door. The straight seam at the back sits snuggly against the door and the point of the triangle points forward.

Step 30. When you need to move your chicken, use her corded comb loops to pick her up. It's very tempting to just pinch the top of her head but trust me, she will eventually go blind if you do that...

Step 31. And if you get step 10 wrong and put the beak and comb the wrong way round and don't notice?? You get this -

I know it's not easy to tell from this photo but the flat seam which should rest against the door, has the beak coming out of it and the comb is on the front pointed side of the triangle! So she has to sit sideways onto the door, or forever have her back to the room. I haven't made that mistake again... Can you also see how the top of the head doesn't sit centrally - it leans towards (what should be) the front point?? That's why I now cut the lower body fabric an inch smaller than the upper body, as explained in step 1.
And that's it! Once you've got the hang of it, you'll be making a whole flock and how about some chicks too? More about the chicks and how to speed piece them another day.

I hope you've found my little photo tutorial helpful and do let me know if you think I've made a mistake anywhere.
Once I work out how to upload a printable PDF, I'll draw up a single sheet of basic instructions, with beak/comb placement etc. I always have my scribbled notes next to the sewing machine while I work!
UPDATE I've drawn up a quick placement guide which you can see below, to keep next to your sewing machine when placing the comb, beak & label, to be sure you get them right. It's a jpeg rather than a pdf at the moment and it's not to scale but hopefully you should be able to print it. And naturally, blogger has decided to turn it on its side...

Thanks for the clear instructions! The chicken turned out great and will be very durable! I used buttons for the eyes and sewed them on right before stuffing, they would have been easier to sew before I closed up the bottom!! The photos were helpful :)
ReplyDeleteThank you so much for your kind words!
DeleteI can't believe it's been over 7 years since I designed my chicken and wrote the tutorial - so lovely to realise people are still using it :-)
And yes, button eyes sound like a really good idea!!