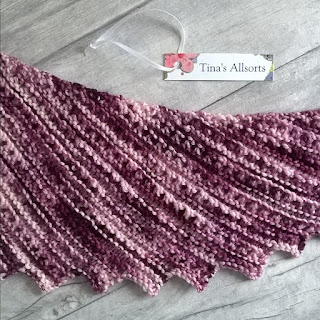
I'd looked for the perfect pattern for some considerable time but couldn't find one anywhere that was exactly what I wanted and realised I would have to try and design my own.
I mentioned at New Year that I'd seen a design called the Hitchhiker scarf way back in May and I really liked the teeth along the edge - but it was all in garter stitch and I don't like knitting garter stitch at all and I'm not keen on its texture either. (Although I have now discovered I don't like working it due to my knit row tension being too tight, not the stitch itself - although my New Year's Crafting Resolution is to try the stitches I'm no good at and maybe with practise I will grow to like them!)
I didn't see the point in buying a pattern that I would then change beyond all recognition, as I knew it should be fairy simple to work out something with teeth for myself and there was no way I could bring myself to make it all in garter stitch - I wanted ridges and furrows and eyelets!! (Yes! I want it all!!)
So I set to with needles and wool and working out the texture pattern wasn't too difficult at all as I already had a good idea what would work, it was getting the shaping right too that took a bit of time and there were several frogged samples!! I think I've shown you these pics before, when it was starting to go right -
But then I got the hang of the pattern and the row counting and it rolled along quite well. Although every night I unpicked at least one row once!
Although the pattern itself is simple, there are two things happening at once - creating the texture I wanted with a 6 row pattern, and creating the toothed/curved shape, for which I settled on an 8 row pattern. And when you're not used to counting rows with a texture you're not used to, it's actually quite easy to get it wrong!
The texture pattern I settled on really shows off the plumpness and squishiness of the yarn - I don't think I've ever used anything quite like it. And the colour is just amazing - the pic above captures the colour well. I couldn't resist trying to capture the squishiness on video -
 I didn't want my shawl/scarf to get wider and wider - and wider! - as so often happens with other shawls. I wanted something that would stay manageable when wrapped around my neck. I did it by gradually making the teeth along the edge bigger and bigger and just kept going until I ran out of yarn. (This pic is pre-blocking and doesn't show the yarn colour correctly...)
Once done and loosely cast off, I gave it a good soak to really let the water get into the fibres, gave it a good squeeze then a turn through the salad spinner (yes, really!) and it was ready for blocking. I don't know if you're aware but pure merino becomes very soft and pliable when wet and you think you've Ruined it!! Very scary! But don't panic. Be gentle with it and definitely dry it flat and all its lovely squishiness and plumpness will return.
I very gently spread it across the floor, trying to only open out the outer toothed edge and left it 24 hours to dry - it was still slightly damp then so I folded it up and put it in the airing cupboard to finish.
And now it's glorious! I haven't had chance to take any more pics but I keep going back for a squeeze or two and trying it on this way and that - and wishing the weather was cold enough to wear it!
It would look really good in a solid colour as the texture pattern would show up really well and I have some lovely hand dyed 4 ply that would be just right. I tried to persuade a friend to knit it for me but she wasn't having any of it! Not sure I have the patience to make it in 4 ply myself though! I might
have to work out a crochet version as well!
I have now come across a very helpful website that explains how a "vortex shawl" works - never knew they were called that - and how to design your own. Oh how I wish I'd found it sooner - I could have saved myself a lot of effort but I was searching for a pattern - not instructions on how to design my own! But then if you don't work it out for yourself, you don't necessarily understand how the pattern "works".
The site even has some books you can buy and download on how to design different styles of shawls which looked quite tempting! Go and have a look here -
https://knitting.today/vortex-shawls/
I'm a bit distracted at the moment with a commission for a pair of dog coats which I'm also designing as I work.
More about that next time. Have a good week, T xXx


No comments:
Post a Comment