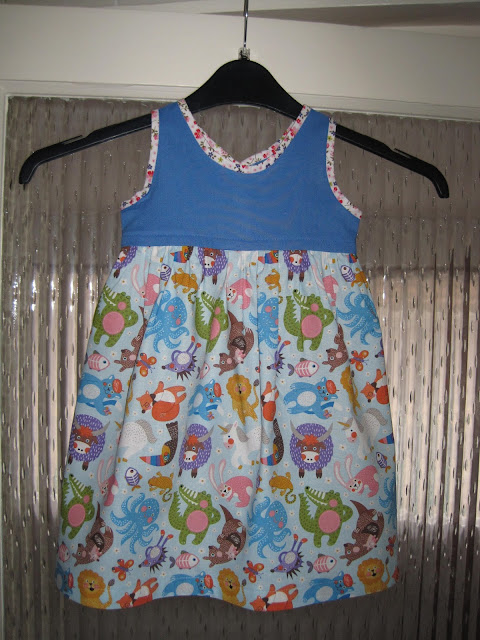
Well, I managed to make one dress today, not two. I was late getting started, then half way through we had visitors, plus the design meant it took a lot longer to make - like 2 1/2 hours!
I was late getting started because I was trying to find a dress tutorial that actually had measurements on the pattern pieces, rather than just telling you to print it out - no access to a printer at home you see. I eventually found THIS and decided what chest size I needed to cut, which happened to match the t-shirt I bought to make into a dress but haven't got round to yet. (I didn't want to go ahead and just copy the t-shirt size exactly as the fabric was stretchy but the dress bodice wouldn't be.) Anyway, I made my own little pattern in the end from the t-shirt, like so -
(I actually cut 2/3" off the bottom of the bodice before attaching the skirt, as I thought it was a little long.)
I placed the pattern an inch in from the fold when I cut the back, to allow for turnings then cut through the fold, plus the back neckline was cut about an inch higher too. I also re-cut the armholes slightly so they were a bit more rounded were they met the side seam, to make attaching the bias binding easier.
I stitched and zig zagged the side seams and did a french seam for the shoulders. The back edges were turned over 1/2", then 1/2" again and top stitched.
I put the binding round the armholes first and was delighted to find they were just the right size to fit over the free arm of the sewing machine for stitching.
Next came the neck binding and I allowed about 12" extra at each end to form the ties at the back. After stitching, a light steaming at the centre front makes the binding shrink a bit and lie flat.
Then I started making the skirt. The 40cm length I had bought was just right and had been cut beautifully straight so didn't even need to be trimmed. I decided to cut about 6" off one side edge so that the overall width was 36". I did a big seam allowance in the back as I needed to leave a small opening and turn under the edges at the top edge where it meets the bodice, to be sure there was enough room to put it on over a child's head.
For the hem, I turned up an inch, then another inch and stitched. Then I put lengths of gathering stitches around the top edge before pinning to the bodice and pulling up the gathering threads. I did it in quarter sections to be sure I got the gathers nice and even. The gathered skirt and bodice were then securely stitched together and as all the gathering might have felt a little scratchy against a child's skin, I found a piece of leftover binding to cover it. You'll have to excuse the blue thread showing on the binding - if I'd used white in the bobbin it might have pulled through to the front. (It's just occurred to me, that if you put the wrong sides together when you attach the skirt, so the seam is on the right side, then cover the seam with a pretty binding, it will also look really nice and you won't have to worry about any scratchy bits on the inside.)
And that's it! Doesn't sound like 2 1/2 hours work does it?...And here's the finished dress -
I haven't put a pocket on it yet but I will before I send it off.
If you want to have a go at making a dress yourself and have access to a printer, then THIS website by Jen is a good place to start. She's made a nice patchwork panel skirt on her dress too that I quite like the look of. May have to give that a try one day...
UPDATE ; For those who would like a pattern to print out for the bodice (One size only, finished chest size 20"), try the link below, or drop me an email and I'll gladly send it to you -
PS And in case you're wondering, no, I haven't started work on my cv either...


No comments:
Post a Comment