Friday, 7 October 2016

CAL Part 7 - the lining

 FOR SALE   - click the link to go to my Folksy Shop 


It's taken me a few days but here it is at last - how I lined my Peacock Tail Bag, and added a recessed zip. (That is, a zip that will sit at the base of the band, out of sight, rather than at the very top of the opening.)
I made sure I took plenty of photos whilst making the lining for my bag. I know Tatsiana has already done her own excellent tutorial but I just couldn't resist doing one myself. It's mostly photos (and I have resized them as there were so many!) with basic text, so I hope it makes sense. Here goes.

Firstly, gather everything you need.

Tina's Allsorts - PeacockTailBagCAL, The Lining

I found a very small piece of turquoise fabric in my old patchwork stash that exactly matches the yarn to line the band. Then there's the pink lining fabric and zip. Iron on interfacing. Stiff interfacing for the band. D rings and bag clips. And chocolate!


I laid the bag on the iron on interfacing and cut round it, allowing a small seam allowance. The "nicks" at the bottom will add a little shaping later. Here's a close up -


I'm using a muslin type interfacing. Never tried it before but thought it might add a little body to the fabric, plus someone on Facebook suggested interfacing the whole of the lining,not just the band, to make it more durable. Iron it really firmly onto the wrong side of the pink fabric, then cut out.


Make a slip pocket to go on one half of the lining. Decide what size pocket you want and cut one in pink fabric and one in any other fabric. Stitch all the way round leaving a small opening to turn through.

Tina's Allsorts - PeacockTailBagCAL, The Lining

Carefully push out the corners after turning through and press. Pin in place and stitch to the bag on 3 sides, leaving the top open. If you want to, add a line of vertical stitching to make two pockets rather than one big one.

Tina's Allsorts - PeacockTailBagCAL, The Lining

Now I must apologise here... It's been so long since I fitted a zipped pocket, I had to cobble it together. So I'm sorry but I'm going to say "now insert a zipped pocket". But not tell you how... Sorry. There are loads of tutorials online that will tell you how. This is how mine looked after a bit of cobbling!!

Tina's Allsorts - PeacockTailBagCAL, The Lining

Tina's Allsorts - PeacockTailBagCAL, The Lining

When I put the lining into the bag, I want this zipped pocket to be against the "back side" of the bag.


Now stitch those little dart shapes on both pieces, then pin the front and back right sides together, matching the darts and stitch round the curved edge, leaving the top 2 or 3 inches open so you can attach the top band easily later.

Tina's Allsorts - PeacockTailBagCAL, The Lining

Can you see how those darts give a rounded bottom to the bag lining?

Tina's Allsorts - PeacockTailBagCAL, The Lining

Lay your bag on top of the lining to see if you need to adjust the shaping maybe. I clearly needed to.

Tina's Allsorts - PeacockTailBagCAL, The Lining

Don't forget to eat some chocolate now and then to keep you going. (I haven't had one of these for years. They're not the same anymore...)
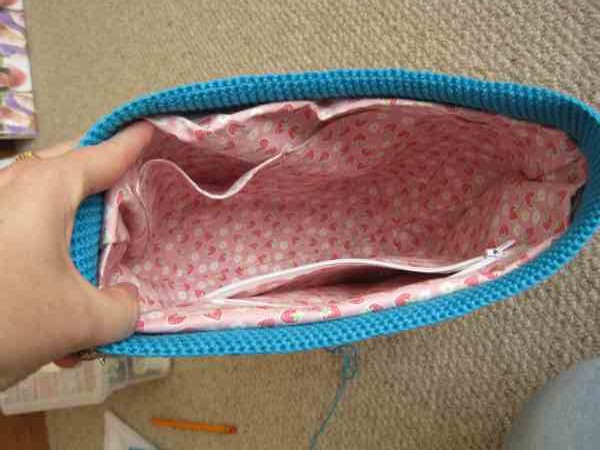
Tina's Allsorts - PeacockTailBagCAL, The Lining

 Fold the top edge over and slip the lining into your bag and try it for size. Looks ok so far.


Now prepare the top band. Tatiana cut hers on a curve but I had such a very small scrap of fabric (in just the right colour) that I had to cut it straight then make a tiny dart in the middle to give a little shaping. It would look better if cut on a curve.
Add a layer of the iron on interfacing but start a quarter inch down from the top edge. Cut a piece of stiff sew-in interfacing that is double the height of the iron on interfacing but a little narrower - you don't want to catch it in the side seam as it will be too bulky. Fold this in half and stitch it to the band lining along the top edge of the iron on interfacing. Turn down the fabric to the wrong side and press firmly. Did that make sense??

Tina's Allsorts - PeacockTailBagCAL, The Lining

Turn the lining right side out and lay one of the band linings right side down, on top. Stitch through this layer with a narrow seam, keeping the stiff interfacing free. Turn over and repeat on the other side. Press this seam up, then let the stiff interfacing drop down to cover it. Now stitch the top of the side seams (you left them open earlier), then turn through and press again.

Tina's Allsorts - PeacockTailBagCAL, The Lining

Make a cup of coffee and eat some more chocolate!

Tina's Allsorts - PeacockTailBagCAL, The Lining

Turn it through again (sorry!) and pop it in your bag - shake it about a bit to get it just so. It should look like this. 


Now make the D ring loops. Cut 2 pieces of lining fabric, fold the edges into the middle, then fold in half again and press. Put it through the D ring, fold in half and stitch to hold it together. 

Tina's Allsorts - PeacockTailBagCAL, The Lining

Line it up with the side of the bag and stitch firmly in place through all the layers of the bag lining and stiffening. I forgot to take a photo, so the one above has the zip inserted as well. 
(If you want to, you can still crochet 2 pieces and slip stitch them in place later to cover the fabric.)
If you're not going to add a zip, you can skip ahead and stitch the lining into the bag now. 


Otherwise, prepare your zip.
Lay your bag flat and measure the width. (I bought a zip which was that measurement plus at least 2 inches.) Cut two pieces of lining fabric to cover the zip. Fold over all four edges and press. Make sure your folds are absolutely straight. 


Enfold the zip in this piece of fabric and stitch close to the zip teeth, trimming the "head end" of the zip and pushing it in to cover it as below.

Tina's Allsorts - PeacockTailBagCAL, The Lining

Make sure you leave the "foot end" free.


Now, I forgot to take a photo as I did it but you need to cut a little piece of fabric, fold in all the edges, fold in half and cover the zip foot end. Trim the very end of the zip fabric first. It should look like this -

Tina's Allsorts - PeacockTailBagCAL, The Lining

Tina's Allsorts - PeacockTailBagCAL, The Lining

Now you're going to place the zip centrally on the band lining - I opted to insert it in the same direction as the zip on the pocket. Put it a quarter inch up from the join with the main fabric but parallel to the top edge. (Remember, the lining is still not stitched into the bag.)
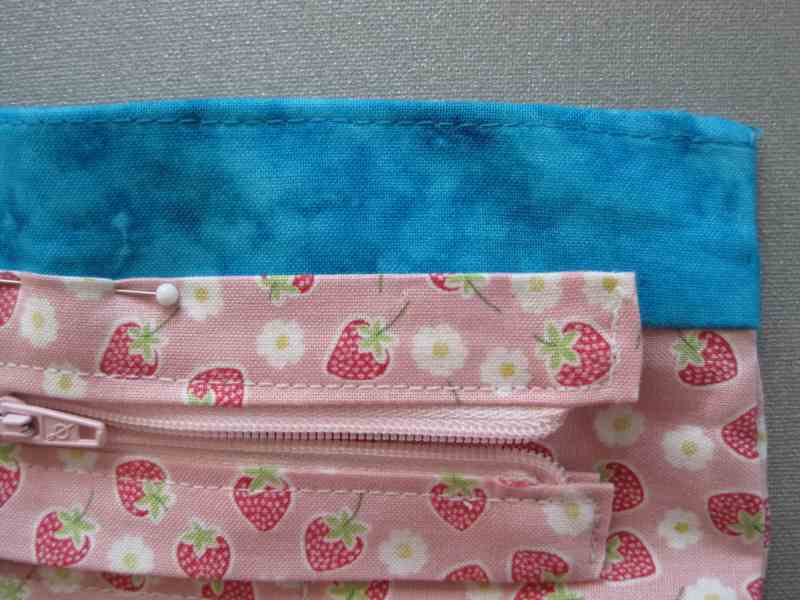
Tina's Allsorts - PeacockTailBagCAL, The Lining

Pin it in place, then stitch close to the top edge of the zip, making sure you stitch through the stiff interfacing as well. Do Not turn and stitch parallel to the side seam!
Turn the bag lining through and close the zip to make it easier to line up and pin the other side of the zip, then stitch. You see that gap between the end of the zip and the side of the bag in the photo above?? That's very important. Make sure you leave a gap. If you want to be precise, measure the full width of your zip (with fabric added) - the gap needs to be half this width, plus a tiny bit.

Tina's Allsorts - PeacockTailBagCAL, The Lining

Here you can see the bottom edge of the zipped stitched in place and the top edge pinned ready. And that gap at the end of the zip? It helps the sides of your bag form a gusset shape.


Ooh, I've just remembered that I meant to say that I learned a new crochet stitch this week!! Woo Hoo!! Can you see that textured edge??? That's crab stitch. I've tried to do it before but just couldn't make sense of the written instructions I'd seen. 
I saw someone else's bag on facebook and they'd done a crab stitch edge which looked really good, so I found a you tube video by Moogly of how to do it and OMG - not only was it dead simple but it looks FAB!!

Tina's Allsorts - PeacockTailBagCAL, The Lining

Ok. Back to the sewing. Once you've stitched both edges of the zip, give everything a final press and then insert the lining back into your bag (with the right side facing in of course). Line up the D rings with the side seam on the bag and pin the lining a fraction below the top edge.
Now STOP here and think. Which shoulder will I carry the bag on? Where do I want the head of the zip to be when it's zipped up?? Hold the bag against you and make sure you've got everything the right way round. No?? Then turn the lining around and pin again. So much simpler than stitching, getting it wrong and unpicking...

Tina's Allsorts - PeacockTailBagCAL, The Lining

Here you can see the back of the bag towards you, with the open end (or head end) of the zip to the left, pinned ready to stitch. Working from the right side (that's the crochet side), work a very straight row of stitches along the bottom of that top row of crochet (crab) stitches. If this were patchwork, you would "stitch in the ditch", so the stitched line isn't obvious on the right side. (I haven't taken a photo of that. Sorry.)

Tina's Allsorts - PeacockTailBagCAL, The Lining

Tina's Allsorts - PeacockTailBagCAL, The Lining

You see the end of the zipper stuck up here? If you don't like it, you can push it inside so it doesn't show. 

And if you decide you don't want it zipped up all the time, then unzip completely and the zipper will hang freely inside the bag like this - 


Tina's Allsorts - PeacockTailBagCAL, The Lining

And that's it!! Apart from the strap of course. I still need to make the strap.... maybe this weekend. Maybe!!

I hope you've managed to follow what I did and apologies again that I chickened out of showing you how to insert a zipped pocket! I must look for a good tutorial and give you a link to it.
(And if I made any mistakes, please point them out so I can correct them.)

UPDATE :  The strap is now completed. I crocheted it and backed it with the pink fabric, with a little stiffening added,then finished it off with a slidey buckle to make it adjustable. 

Oh yes and it's FOR SALE! Pop across to FOLKSY for details. 
(If you're interested but not in the UK, then email me and I'll get a price for postage.)


Thursday, 29 September 2016

Meet Lucy!!

Meet Lucy - my very own Yarndale Sheep!!!


Remember I mentioned my Sheepish Sheep earlier this month, that I only made and sent off to Yarndale just in time?

Well, I decided to pop an SAE inside the envelope with her, along with a note and a donation, asking if they might be able to "buy" a sheep and send her winging her way to me.
I didn't think they would as I could guess just how busy they were all going to be. So imagine my delight when I arrived home from a really rubbish day in the office yesterday to find a squishy squidgy envelope waiting for me containing my very own sheep!!! Isn't she gorgeous?!! 

You know, she looks really familiar. Maybe because her little jacket is the same colour as one in the pic above from the pattern. But I can't help feeling I've seen her on someone's blog. Do you recognise her?? Please let me know if you do!
I've decided to call her Lucy in honour of Lucy of Attic24 would wrote the crochet instructions and took all the fab photos to go with it.

I took her into work today for a little look around the office.


I think she quite enjoyed frolicking amongst the windowsill plants


Looking out the window at the Deanery.


She took quite a shine to Shaun!!


Then she met the rest of the Team.

I wasn't the only person inspired to make a sheep by any means! I came across a Postcard From Gibraltar the other day when I was looking at other sheep. (Yes. Sad, I know.) Reading through some of her blog brought back happy memories of a holiday there several years ago - her blog is well worth a look and I'll be going back for a longer read soon.

Anyway, back to the sheep! There were over 700 in the flock and their sale raised over £3,000 for Martin House Hospice! I saw a note on facebook to say the hospice would be happy to still receive sheep to sell to raise funds, so maybe one day I'll make another sheep or two.

I will get to Yarndale myself one day. I will... and I might just take Lucy along for the trip!

I still can't believe I've got my very own Yarndale Sheep!! I wonder where my Sheepish Sheep is living now?... Is she with you? Have you found the heart hidden under her coat?? I wonder...

Sunday, 25 September 2016

CAL Part 6 - Nearly there !!

The Peackock Tail Bag CAL Part 6 was released this week and my bag now looks like a bag! Albeit without a handle/strap yet...

Tina's Allsorts, Peacock Tail Bag CAL

Tina's Allsorts, Peacock Tail Bag CAL

What do you think?? Not bad eh, even if I do say so myself.

Tina's Allsorts, Peacock Tail Bag CAL

Here's a close up of the double crochet band around the top. Very neat.

Tina's Allsorts, Peacock Tail Bag CAL

And the inside!! Did I mention I decided not to darn in the ends, just secure them? As the bag will be lined no-ones going to see them, so why bother??...

Tina's Allsorts, Peacock Tail Bag CAL

I made a little bag charm to go with it with beads I bought for goodness knows what but never used,

Tina's Allsorts, Peacock Tail Bag CAL

This shot shows how the front and back are joined. The pattern called for placing the 2 sides together right side out and working a row of double crochet through both layers. This would have formed a ridge along the join on the right side that I didn't fancy. So I put the 2 sides wrong side out before joining, so the ridge is on the inside and the outside is smooth.
And here are some more purely gratuitous photos!

Tina's Allsorts, Peacock Tail Bag CAL

Tina's Allsorts, Peacock Tail Bag CAL

Tina's Allsorts, Peacock Tail Bag CAL

I need to make the strap still - I've pretty well decided that I'll make a crocheted strap that will have fabric one side for strength. Just need to make it...
The final part next week will have details on how to make and attach the lining. I think I can work that out for myself and may well do a photo tutorial as I'll be adding pockets and a zip.

Am I getting on with that strap today?? No, of course not! I started another project.

I made this little bag a year ago and I've used it so much - it's perfect for a day out when all I need is my wallet, camera, phone and car keys.
I've often thought over the summer that it would be nice to work one in crochet using the purple cotton yarn leftover from my crochet bolero. Highlighted with variegated pink from the abandoned cardigan.

I drew round the bag on a piece of paper to use it as a pattern - crochet is brilliant like that. Just draw your shape and keep laying your work on it, and adjust the stitch height etc as you go.
This is what I've done I've got so far -

Tina's Allsorts

Tina's Allsorts

I have made a start on the other side - it's completely different, using freeform crochet. I've never tried that before but have plunged in to give it a try. Not sure quite how it's going to go but I do enjoy not having to follow a pattern - except a drawn shape that is!!

Tina's Allsorts

And I did a teeny bit of sewing too! We had some tiny embroidery scissors in at work in pastel colours and I thought maybe I could buy a pair to keep in my bargello project bag and make a little scissor keeper/needle rest for it. I used some of the scraps of flamingo fabric from the dress a girl dresses I made a couple of weeks ago, along with a scrap of aida and binca - they both have nice big holes, perfect for a darning/tapestry needle. (I only made one but it's double sided.)

Tina's Allsorts, scissor keeper/needle rest Tina's Allsorts, scissor keeper/needle rest 


I wonder what the girls at work will make of it tomorrow?? Til next time - T xx


Sunday, 18 September 2016

CAL Part 5

Part 5 of the crochet along bag is finished, lightly washed and drying in the sun. Next week, the two sides will be joined together, then the final part will be adding a fabric lining.

The pattern for part 5 was quite hard on the wrists and my right wrist still aches today - it was worth a little pain to have so much texture though. I worked some of the rows in two colours again to make the textured stitches stand out more and I'm very happy with how it looks.

Tina's Allsorts

Tina's Allsorts, Peacock Tail Bag CAL

Tina's Allsorts, Peacock Tail Bag CAL


Last week I put some photos of different fabrics on facebook and had loads of lovely comments (there's a screenshot of them below.) Most people liked the fabric at the top which is mid turquoise with the bright pink flowers. It's quite vibrant though it does match the bag colours. My favourite is bottom left - a pale pink with dark pink strawberries. I want to make a lining with a zip closure at the top for security and may make a crocheted strap with fabric one side, so the fabric will be quite visible. What do you think??
I think I'll wait until I've joined the 2 sides together, then actually put the fabric in the bag to see what it looks like in situ.

Tina's Allsorts, Peacock Tail Bag CAL

I will miss it when it's finished... although it has given me ideas for a small bag just big enough for a wallet, car keys and phone using the left over purple yarn from the bolero I made in July. Maybe with either variegated pink or gold highlights.


Did I mention before that a lady had been in touch about Dress a Girl?? She's also been working on a teenage sized pattern but did a much better job of it than I did! (ie She actually finished it and got someone to try it on and made adjustments so it was comfy.) At the same time we had some new fabrics in at the craft shop a lovely tiny flamingo print in either pink on white, or white on pink. Anyway, it got my sewing juices running again so I bought half a metre of each and produced these -

Tina's Allsorts, Dress a Girl

Here they are in the shop window to give people an idea of what they could make. (Apparently several people had asked if we sold the pattern but it's a free one I found on line.) 
I made these two are in the smallest size 12-18 mths. I think I might be making some more tiny dresses because they are so fast to make and look just so darned cute!! They also only cost about £3 each to make including elastic/ribbon. And that's before you taken my staff discount into account.

I really must make something else to go in the shop as a sample. A simple patchwork cushion or bag maybe? We always sell more when people can actually see what the fabrics are like when they're made up into something.

Well, that's all for today. Not much progress to show you on the Bargello Alliums to share. I worked some rows of green while I was in the shop last week but haven't done any at home for a couple of weeks. I did say the repeating pattern would turn into a labour of love didn't I??

Have a good week and see you again soon!